Linux Configuration (DHCP and SSH) – CentOS Version
What is CentOS?
When you set up a Linux machine, server or client, you more than likely need to do a bit of configuration to set it up. This guide will show how to set up a CentOS system from installation to remote management using key-based SSH configuration (the only way you should SSH….password authentication is DIRTY!!!).
CentOS is essentially the desktop version of Red Hat Linux and is based on that distribution of Linux. It stands for Community ENTerprise Linux Operating System. It is open-source like most things Linux related and free to use. It has multiple security features built into it, such as a built-in firewall we will be configuring later and lots of documentation with the CentOS Wiki: https://wiki.centos.org/FAQ/General.
What are we doing with it?
We will be creating a virtual machine running CentOS and adding it as our DHCP server. Then, attach it to the active directory network under the domain controller we build in a previous post.
See here if you didn’t read that: https://nekrotic.co.uk/2021/09/12/active-directory-setup-the-basics/.
This will be a small post compared to the previous one, so don’t worry about too much reading.
Whats the protocol(s)?
The protocols that will be covered are:
- Dynamic Host Configuration Protocol (DHCP)
- Secure Shell (SSH) Port
Dynamic Host Configuration Protocol
In the last lab, we had to manually configure our IP addresses through our network adapter settings on windows for our domain controller and workstation. Imagine doing that for a large organisation with hundreds of desktops and countless laptops requiring configuration every time they re-enter the building. WHO HAS THE TIME!?
Meet Dynamic Host Configuration Protocol (DHCP).
DHCP is a management protocol used to configure host networking configurations automatically, assigning IP addresses, DNS Servers and Default Gateways. You will constantly use DHCP when you move from one network to the next; your device is continuously configured and reconfigured, and you are none the wiser.
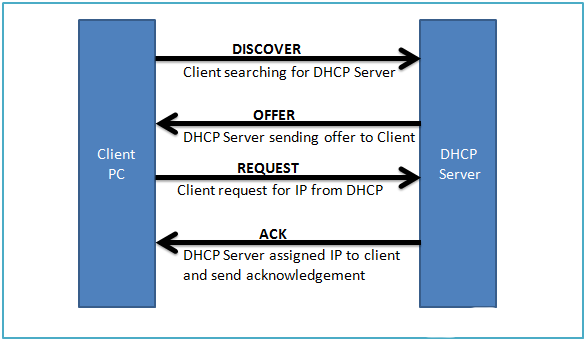
The Flow of DHCP is after an ARP request; the device sends out a Discovery packet. This is when the host is looking for a DHCP “HEY! I NEED AN IP ADDRESS WHO IS GOING TO GIVE ME ONE!!??”.
The DHCP server then offers the client if it wants to converse with it and take an IP address from it, “I AM A DHCP SERVER ILL GIVE YOU ONE!!”.
The Client then requests requesting an IP address “FINE HURRY UP PLEASE AND GIVE ME ONE!”
The Server responds and acknowledges, “RIGHT THEN YOU CAN HAVE 192.168.1.35! BE OK WITH THAT!!”.
This is the basic overview of DHCP.
Secure Shell (SSH)
Secure Shell (SSH) is a protocol to gain remote Command Line Interface access to a given machine. Unlike other protocols such as Telnet, SSH is encrypted completely using a mix of symmetric and asymmetric encryption using a process called the Diffie-Hellman key exchange.
This is because while asymmetric encryption is more secure, it is VERY computationally intensive and slow. At the same time, symmetric is less secure (weakness in the singular key exchange); it is far faster and more efficient.
A Diffie-Hellman combines both, using asymmetric (public and private key encryption) to exchange a secret (or session) key between two hosts for symmetric encryption, circumventing the problem for symmetric and avoiding the power tax of asymmetric.
SSH can have either password-based authentication or key-based authentication to log into the machine. In addition, SSH can take four connections at a time without account lockout. , Okay, yes, brute-forcing will take a very long time if you can only try four passwords at a time and a password list of 14 million (rockyou.txt). Still, the only security you have there is praying that your password wasn’t involved in a leak and that the hacker doesn’t have patience. This is where key-based authentication comes into play.
Key-based authentication works slightly differently. Asymmetric encryption has a public and private key. Typically the public key is used to encrypt, and only the private key can decrypt. Therefore, only the owner should have a private key.
What if I told you the private key could also encrypt, and only the public key can decrypt. GAME-CHANGING…how?.
Say you want to use key-based authentication to a remote server, the server gives you a piece of data (a random string perhaps) and tells you, “If you are who you say, you encrypt this with your private key and send it back to me”. So you do that….you have an encrypted piece of data only your public key (that everyone has) can decrypt. The server then decrypts the data you send, and it matches, proving that it was encrypted with the correct private key. This is also how digital signing works and is a method of verifying the identity of an individual.
This cannot be brute-forced anywhere near as effectively as password-based authentication and is the prefered way to authenticate via SSH.
Lab Time!
Building into the previous network about Active Directory, we will be adding one more machine to our network…the CentOS computer.
These are the specs for the virtual machine in VMware I used:
- CPU Cores 1 (2 threads)
- 1GB RAM
- 20GB Hard Drive Space
- Same Network as the LAN AD (VMnet19)
ISO Download Link: https://www.centos.org/download/
This guide will not detail CentOS installation, and we will assume you have completed the OS installation.
Post-installation, we want to configure the networking settings.
Using the following command seen in the screenshot, ens33 does not have an IP address. Therefore, we want to configure this manually.
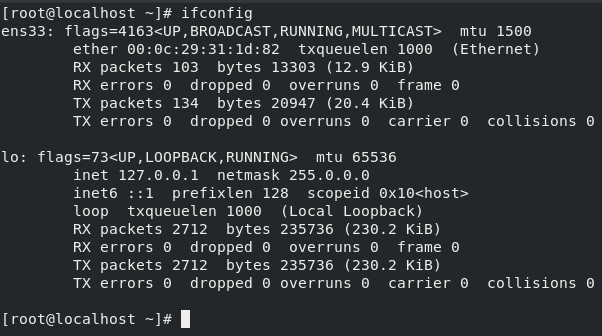
Networking configuration settings are held in CentOS /etc/sysconfig/network-scripts/ifcfg-<interface>. We want to configure this with our preferred text editor (the correct answer is vim).

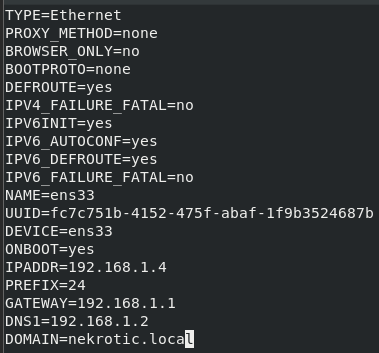
Keeping everything the same except the following values:
- BOOTPROTO=none — from DHCP
- ONBOOT=yes — from no
- IPADDR=192.168.1.4 — from whatever it was before
- PREFIX=24 — from whatever it was before
- GATEWAY=192.168.1.1 — or to whatever your firewall is
- DNS1=192.168.1.2 — or to whatever your AD is
- DOMAIN=nekrotic.local — or to your own domain
We then want to change the hostname on our box with the following command:
hostnamectl set-hostname dhcp01-nekrotic We then reboot the system for the settings and new hostname to take effect.
sudo yum update SSH installation and Hardening
SSH is where most Administrators will spend a lot of time and where many hackers would desire to be. After all, what is there not to love as a shell that has control over a system remotely and securely. So let’s set up our server for remote administration but harden it to make it a lot more difficult for an attacker to compromise the system this way.
We will be installing and setting up the SSH service in CentOS, opening the built-in firewall to allow for the service, disabling root access through SSH and enabling Key-Based authentication for SSH. Key-based authentication is the recommended way of accessing SSH since this is a lot more difficult for an attacker to compromise, and there is no practical way to brute-force private keys.
SSH Installaion and Set up
On a server, we install the service using the following command:
sudo yum -y install openssh-server openssh-clientsWe then want to enable the service to start on boot and start the service to begin with.
sudo systemctl enable sshd
sudo systemctl start sshd
We can then check the service status with the following command:
sudo systemctl status sshdNow this will not work on its own on CentOS. This operating system has a built-in firewall that we need to make a rule to allow the service.
We can view the allowed services and ports using the following command:
sudo firewall-cmd --list-allWe can add the service for ssh using the following command:
sudo firewall-cmd --add-service=ssh --permanentNote: The –permanent tag is so that the firewall rule stays effective when the machine is rebooted.
We then need to reload the firewall with the following command:
sudo firewall-cmd --reloadThis is our SSH port enabled and set up…but it’s not hardened and could still be vulnerable.
SSH Hardening
Now that we have SSH running, we should probably disable root access to SSH.
This is pretty easy to do. In CentOS /etc/ssh/sshd_config, there is the section PermitRootLogin; we want to change yes to no.
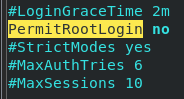
This denies anyone that has a UID less than 1000 to access SSH.
That is root access disabled, but we still have a problem with brute-forcing.
Let’s get a bit more complicated with ssh-keys and enable key-based authentication.
SSH key pairs are two secure keys used to authenticate to a server. Each key pair consists of a public and private key. The client (Administrator) keeps the private key under total secrecy and security, and the public key is given to everyone.
The server can test if the client requesting access to the server has the correct private key by asking them to encrypt a piece of data with the key and send it back; if the server can decrypt the data using the corresponding public key, then the client indeed has the private key, and a shell is spawned.
First things first. Create a key pair. Using the following command, we can create an ssh key pair. (Make sure you are the user you wish to authenticate with)
ssh-keygen After this, it will ask you to enter in a passphrase. This will be what is used to create the key pair.
You then want to copy your public key to the server you wish to authenticate to and put the public key into the users .ssh/authorized_keys file (If it doesn’t exist, create a new one)
On a Linux system, we can do this with the ssh-copy-id command like so:
ssh-copy-id [email protected]However, this does not work on a Windows machine.
We can do this using our currently configured password-based SSH using the following command.
cat .\.ssh\id_rsa.pub | ssh [email protected] "cat >> /home/nekrotic/.ssh/authorized_keys"We have the public key in the user’s ssh authorized_keys file and a corresponding private key. We then want to disable PasswordAuthentication and enable key-based authentication.
Editing the following lines in the /etc/ssh/sshd_config file to do this.
RSAAuthentication yes
PubkeyAuthentication yes
ChallengeResponseAuthentication no
PasswordAuthentication no
UsePAM no 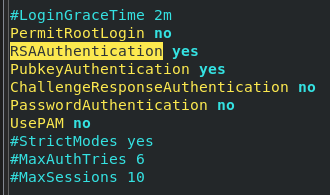
Restart the SSH Daemon for these changes to take effect.
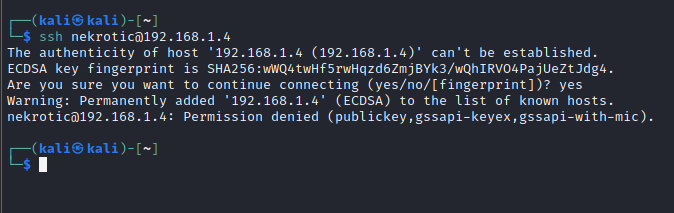
systemctl restart sshd You now have only ssh-key based authentication that is very difficult for attackers to breach.

If an attacker that does not poses the private key attempts to connect, they will be presented with the following message.
DHCP Installation and Set-up
Now that we have our server and we have a secure remote management option available to us. Let us set up DHCP for the whole point of this server.
Now there are different ways to install services across operating systems, and the difference between CentOS 6, 7 and 8 are just the same.
If you are on CentOS 6 or 7, use the yum package manager like so:
yum -y install dhcpHowever, if you are on CentOS 8, then you use dnf like so:
dnf -y install dhcp-server After this, we then want to edit the configuration file found in /etc/dhcp/dhcpd.conf and fill out our desired configurations.
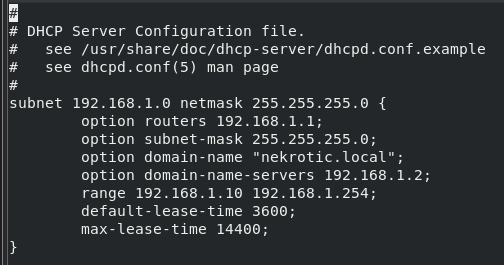
Breakdown:
- option routers — this is the default gateway
- option subnet-mask — this is the subnet mask
- option domain-name — this is the domain we are in
- option domain-name-servers — this is the DNS configuration
- range — this is the range of IP addresses we can assign
- default-lease-time — this is the time a system can have an IP address for minimum (in seconds)
- max-lease-time — this is the maximum time a system can have an IP address for before renewal (in seconds)
We then enable the service and start it with the following commands:
systemctl enable dhcpd
systemctl start dhcpd
We then, of course, need to set the firewall to allow the service in CentOS:
firewall-cmd --add-service=dhcp --permanent
firewall-cmd --reload
After this, then you should have your DHCP Server sorted and running.
Linux File Permissions
This is not CentOS specific; instead, let’s look at how Linux File Permissions actually work and manage users and groups within all distributions.
Creating a new user within Linux requires root permissions. For example, using the following command, we can create a new user:
sudo useradd bob This will create a new user on the system without a password. To set one, we would need to use a different command:
sudo passwd bob We will be prompted to set a password and confirm it; this will then change the password of the user bob (we can use the same command as the logged-in user without sudo or the user-specified to change the password of the current user)
We can then create groups in Linux with the following command and add users to the group with the second command:
groupadd standard-users
usermod -aG standard-users bob
-aG appends the user to the group standard-users
Linux Permissions and Octal Notation
With Linux permissions and octal notation, you might be confused if this is your first time.
Using the command:
ls -l We can see the files and directories in the current working directory as well as the permissions.
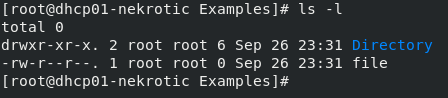
We can see on the right there are the permissions
Breakdown:
- the first “bit” you can see is the file-type. the directory has the d flag and the file has –
- the next three “bits” are the owner permission. the owner has read (r) write (w) and execute (x) on the directory (directory execute means they can traverse inside the directory), and read and write on the file
- the next three bits are the group permissions layout
- the last three are everyone else’s permissions on the file
- the next collumn (2 and 1 for directory and file respectively) are showing what are links to these files and directories
- the next collumn is the owner of the file or directory
- the next collumn is the group that owns it
- after that is the file size
- following that is the last time it was modified
- and finally the name of the file and directory
If we want to change the owner of a file, we can use the following command
chown bob fileTo change the group of a file is similar
chgrp file standard-usersNow we get into octal notation. This is where the numbers control what permissions a file/directory has.
Now first, we translate the possible permissions into numbers to understand this.
- x (execute) = 1
- w (write) = 2
- r (read) = 4
Now we can add these numbers up to give a total of 7, 6, 5, 4, 2 or 1.
This matters because if we want a file to have read and write but no execute permissions, we do 4 + 2 = 6.
Now how do we apply this?
we use the chmod command to change the permissions on a file, and we can change the permissions in the order of what we saw with the owner, group, everyone
For example:
chmod 762Let’s look at what this is
- 7 = owner permissions, this position tells chmod what to set owners permissions at (in this case 7 = 4 + 2 +1 so read write and execute)
- 6 = group permissions, this position tells chmod what to set the group permissions at (in this case 6 = 4 +2 so read and write)
- 2 = other permissions, this is setting the permissions for everyone else on the system in this position of the arguments ( 2 = write permissions)
Conclusion
SSH is a handy service to run on your system but is also a prime target for attackers; ensuring that this service is secured is essential for any system administrator.
DHCP is also a handy tool for managing vast numbers of machines to allocate IP addresses dynamically and is critical, especially when dealing with mobile devices such as phones and laptops.
Linux file permissions can get far more complex, and perhaps setting the incorrect permissions can be dangerous (SUID root on a vulnerable file, for example) but can be a good thing for managing who can have access to what across user accounts and service accounts.