Introduction to Docker
What is Docker?
Docker is containerisation software used to deploy applications on a machine efficiently and securely easily. it uses OS-level virtualisation to deliver software packages known as “containers”. These containers are isolated with their own resources like RAM, CPU cores, Storage and Networking capabilities. Everything a typical bare-metal machine would have.
Containers vs Virtual Machines
When we say that a container is a piece of software that uses virtualisation, people think, “Oh, it’s a virtual machine!”. Well, not quite. Containers and Virtual Machines are fundamentally different. Virtual Machines virtualise hardware, Containers virtualise Operating systems. This sounds rather confusing on what that means, but it’s pretty simple.

Above you can see this is a typical hypervisor diagram. A virtual machine is a hypervisor. This type one hypervisor, such as ESXi, sits on top of the hardware and splits the resources between different operating systems. These virtualised operating systems are full versions of themselves with their own kernels (this is important to remember that kernel part). This makes them very heavy, taking up many system resources to run, a lot of disk space to store, and taking a long time to boot.
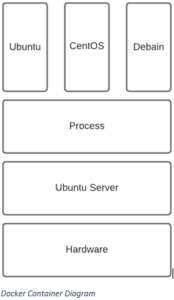
Above, we see how docker runs on a system. Instead of having the hypervisor running on top of the hardware, we have a normal Linux OS running on the hardware. We then have docker running as an application on the OS, which spawns the containers. This is different from how hypervisors work because, in this case, instead of each container having its own kernel, they share the same kernel as the host OS. This takes away all the bloat by sharing the kernel between the containers, making them lighter on the disk, easier on the system resources and super-fast booting and carrying out operations.
The only things that are contained and isolated from each other are the software that would run on top of a Linux kernel, such as libraries and dependencies. this allows us to virtualise different operating systems with ease and run applications within these containers, which means that if you need to run two incompatible applications on the same system, you can containerise them so that they do not interfere with each other. This does mean that docker containers built for a Linux system can only run on a Linux host. The same goes for Windows. When you deploy a Docker container built for Linux on a windows machine, Docker is booting a Linux hypervisor to run these containers on top of windows.
Docker also has the ability to create virtual networks to allow different containers to be part of the same network and multiple different networks each. This is how different containers would be able to interact with each other.
Lab Setup and Installation
For this Lab, I used a VMware Workstation Pro 16 Virtual Machine running Ubuntu Server 18.04. I gave it 4 CPU cores, 8GB of RAM, 60GB of Storage (Why not) and attached it to the NAT adapter. I also started the SSH service on my machine to remote manage it with another Kali virtual machine on the same subnet since I already have VMtools installed there.
After installing the Ubuntu server, I updated and upgraded the system packages using the following command.
sudo apt update && sudo apt upgrade -y
I then went ahead to download and install docker.
sudo apt install docker.io
And finally, we want to download and install all the dependencies.
sudo snap install docker
Once we have completed all of these commands, docker is set up and ready to go.
Our First Container (CentOS)
For our first docker container, we will be installing and deploying CentOS. This is another distribution of Linux developed for compatibility for the large scale Linux distribution Red Hat Linux.
To download the image for CentOS, the following command is straightforward.
sudo docker pull centos
This command is asking Docker to pull the centos image from the Docker hub. this is a registry of images (Operating system images, not family photos) used to create containers. These images are created from Dockerfiles that contain instructions for the environment and entry application of the container (what is the base OS, what dependencies are to be installed, what libraries are to be available, what application will be run).
We then want to run our container using this image. The command for that is as follows.
sudo docker run -d -t –name mycentoscontainer centos
Command Breakdown:
- sudo – this is Linux for please.
- docker run – this is the docker command to run a new container.
- -d – this is the detached flag, this tells docker to run the container in “detached mode” this means when the container starts it does not hijack your current working terminal and instead will start the container in the background, similar to backgrounding a shell or process on normal Linux commands.
- -t – this will spawn a pseudoshell so that when we are interacting with the container we are given prompts.
- –name – is exactly what it says on the tin. Following this command will be what your new container will be called.
- centos – this is defining what image to spawn this new container from.
After we have entered this command, our container should be running almost instantly. We can check our current running containers with this command.
docker ps
Once we have confirmed that the container is running, we would perhaps want to interact with it. The following command will allow us to jump into a bash shell within our container.
sudo docker exec -it mycentoscontainer bash
Command Breakdown:
- sudo – Linux for pretty please.
- docker exec – this means we want to execute a command within the container.
- -it – this is infact two flags merged into one, the -i flag and the -t flag. the -i flag is interactive, telling docker we want to be able to interact with the shell and send STDIN even if not attached to the container. -t is spawning a pseudoshell allowing us to get prompts and feedback from the container as we input commands.
- the name of the container referenced (in this case mycentoscontainer).
- the binary that we wish to spawn and interact with (in this case we want to spawn a bash shell).
We can input the command “exit” to return to the host to exit out of the shell.
Alpine Docker Container
Now we have a CentOS container running. Let’s get something different on there.
Alpine OS is a Linux distribution that is based on musl and busybox. It was designed for security and simplicity rather than compatibility with large scale servers.
Just like before, we will want to download the image from the Docker hub.
sudo docker pull alpine
We will then run the container.
sudo docker run -d -t –name myalpinecontainer alpine
Then check to see what containers are running now.

Now we can see that we have two different containers running on the same system.
WordPress Docker Container
Now we can run operating systems, but we want to run applications. WordPress is one of the most popular content management systems (CMS) for creating, building and maintaining websites. Unfortunately, it is also (if misconfigured) insecure. Running WordPress in a container can make it easy to deploy and secure.
First, we pull the image from the Docker hub.
sudo docker pull wordpress
Then we need to run the container with a twist!
sudo docker run -t -d -p 80:80 –name mywebsite wordpress
This is a similar command as before, only we have added some additional options. The -p command is the publish flag that “publishes” the container’s port to the host external port. Essentially setting up port forwarding from the host machine port 80 to the internal virtual adapter at the container port 80 (WordPress). The syntax is this HOST: CONTAINER.
To stop a container, we use this command.
sudo docker stop
To permanently delete a container, you can use this command.
sudo docker rm
Sometimes when deploying some containers and attempting to stop them, I would get this error.
Error response from daemon: Cannot kill container: 981a44d4c79: Cannot kill container xxxx: unknown error after kill: runc did not terminate successfully: container_linux.go:392:signalling init processs cause “permission denied”
This error I found after frantic googling was caused by the AppArmor service on Linux. AppArmor (or “Application Armor”) is a Linux kernel security module that allows the system administrator to restrict programs capabilities with per-program profiles. This problem with containers helps to remove the “unknown” from AppArmor using the following command.
sudo aa-remove-unknown
Then attempt to stop the container, and it should resolve.
Summery
This was just a beginning look at the capabilities of Docker and containerisation as this is used widely within the industry and managed with applications such as Kubernetes. They are perfect for scalability, security, upgradeability, system sustainability and maintenance if an organisation models its systems architecture around them.